Setting up delivery zones
There are two types of zones you can set up:
- Pricing zones: they are used to define your prices, and are what your clients care about
- Routing zones: are about how you deliver cargo internally - either by defining an area serviced by one of your hubs, or to define a smaller sub-zone serviced by a courier or team of couriers, or to specify a larger area in which you have your shipments delivered by a partner company (franchisor).
There are four main ways in which you can define these pricing or routing zones:
- By listing the countries/cities/provinces/zip codes an area contains
- By drawing the zones on a map
- By setting up zones according to the distance between the sender and the recipient.
- By setting up local delivery zones. By local deliveries, we mean a shipment that can be picked up by a courier and delivered in the same region.
Both types of zones can be defined using any of the four methods mentioned above. The listing cities/provinces/zipcodes can be combined with any of the other three, as long as you have the “Use city list” box ticked in Settings (the green cogwheel on the top right of the screen).
This article will show you how to define zones using all of these methods, plus some useful information regarding setting up routing.
You can mix and match, and choose to define zones by different methods - for example, have the bigger national area as a list, but have some smaller areas drawn on the map.
The application comes with one predefined price zone (Metropolitan), that you can use, change or delete.
Before starting to create zones, you might want to write down a list of them, and maybe think which zones are incorporated by other bigger zones. For example, you can have a “National” zone that is one big area that includes all of your zones, then have it split into 4 big zones and each of those zones again split into smaller zones, and so on. We suggest you always have a bigger zone that incorporates all of your other zones, just to make sure you have all price options covered.
As an example, our “Courier Company” will have a big zone we will call “National”, in which we will include 2 separate zones.
- Create zones by listing the countries/cities/provinces/zip codes an area contains
Start by going to Routing>Zones.
We will take the Metropolitan area and modify it to transform it into our “National” zone, the biggest zone that incorporates all the future zones; click the Edit (pencil) button at the end of the row. The same way, a new zone can be added by clicking on the “+Add the price zone” button.
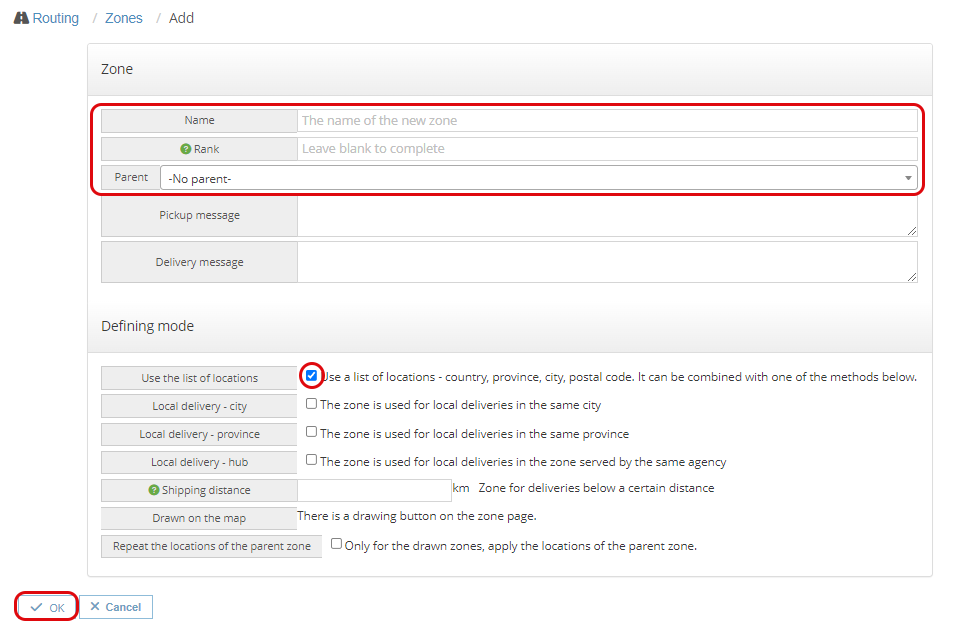
Change or add the name. Since this is the largest zone, it will have rank 1 (automatically) and no parent zone.
Pickup message and Delivery message are specific pieces of information that you want your sending or receiving client to see, for that specific zone. For example, for Pickup message, it could be “You will have to come out to the street to hand in the shipment to our courier, they will not leave the car” - if maybe there is a lot of traffic and long time parking is not allowed in the zone you are creating.
Make sure the Use the list of locations box is ticked.
After pressing OK, you will have an overview of the zone.
Here you can add your list of cities included in it. Since this will contain a whole country, we are writing the 2-letter country code (in our case CH for Switzerland) and then press Add at the end of the row.
You can create a catch-all zone by leaving all fields blank and just clicking Add, and it will include absolutely everything.

Go back to the list to add some new pricing zones, or you can add new sub-zones directly from this page, by pressing the +Add sub-zone button.
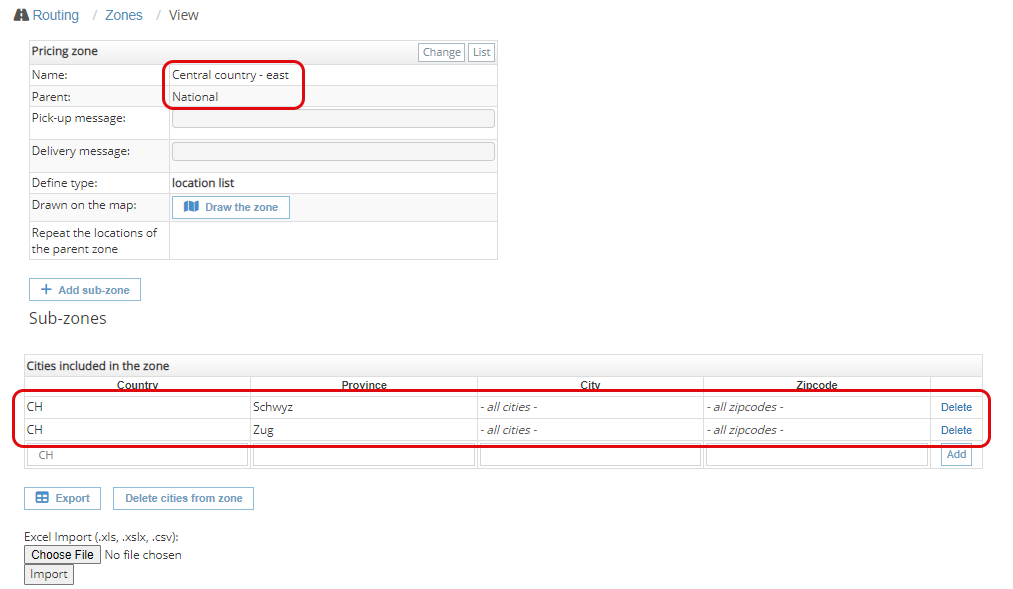
In our case, we are adding 2 zones, one called Central country - east and the other called Central country - west, both with National as the parent zone.
When adding cities to the list, the entire list of cities can be added, either manually or by importing them (will show you below how to do that), or you can add just a province, and everything that is incorporated in it will be considered as part of it.
In our case, we added 2 provinces (Zug and Schwyz) to Central Country - east and the province Luzern to Central country - west.
As you can then see in the zone list page below, we already have three zones, 2 of them being incorporated in the bigger, National one, and both having rank 2 (you don’t have to fill in the rank, it will be autofilled, unless you want the ranks to be in a different, specific way). You can always change and rearrange ranks as you wish, by pressing the Reset ranks button.
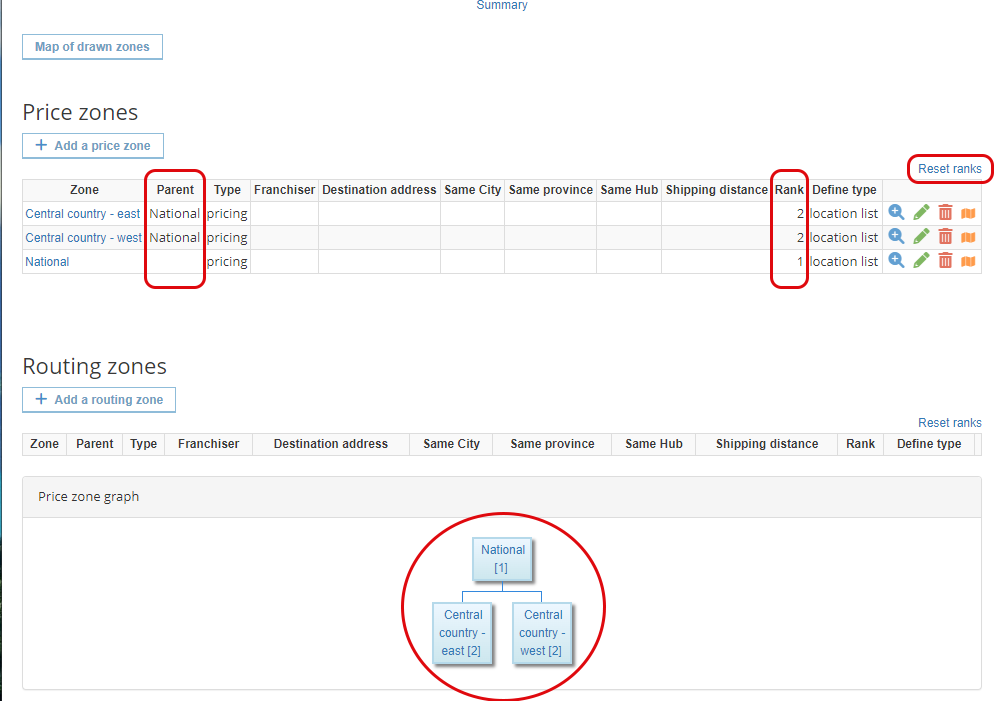
You can create, like this, a tree for your pricing zones as detailed as you want.
On this example account, we will further add 2 more zones into Central country - east, in order to show you how to add the list of cities.
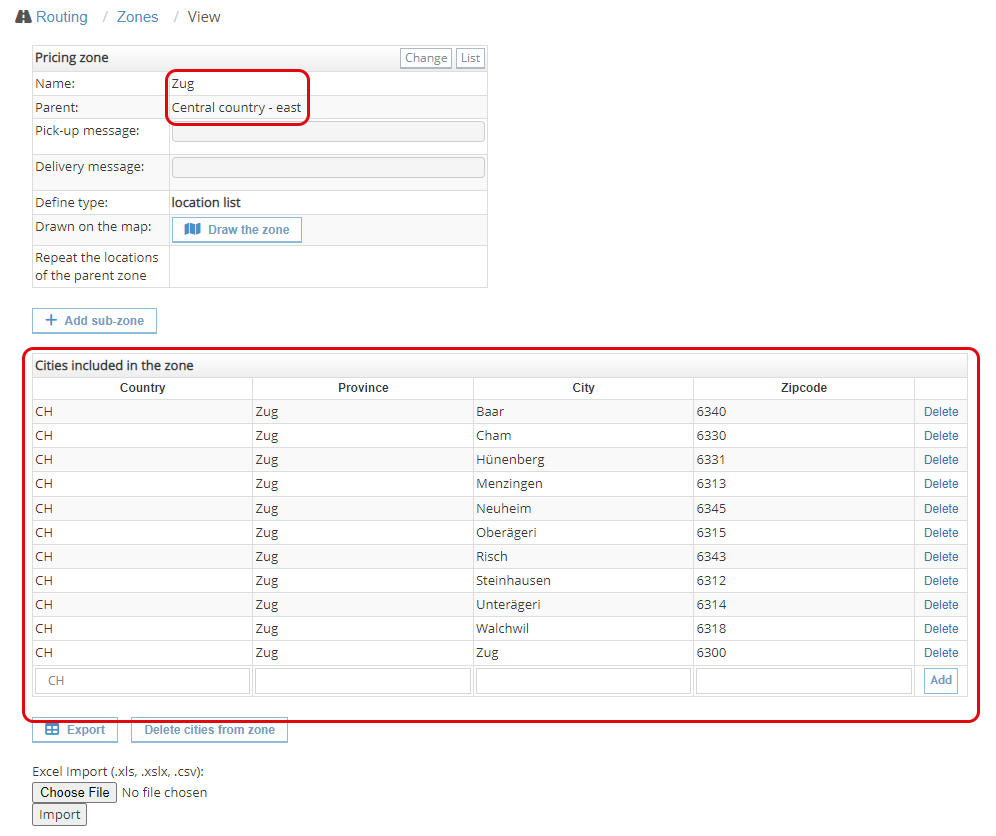
At first, we create the pricing zone called Zug, with Central country - east as parent.
The zone Zug has a very small amount of cities, so we can add them manually.
Again, in the Cities included in the zone table, you will fill in the province, city and zip code (if you use zip codes). If a city has more than one zip code, you can just fill in the name of the city as many times as you need, each time with a different zip code.
As you can see below, the city list of this zone was pretty small, thus easy to fill in manually, but if you have a long list of cities, you might want to import it from your computer.
We will now add a pricing zone with longer list of cities, to show you how to use the Import option.
In order to do that, you will need a list of all the cities/zip codes of the area you are interested in. Depending on what country you are from, you could find this list online, receive it from an administrative office or buy from companies that sell them.
I just made a new pricing zone called Schwyz (with Central country - east as a parent) and I filled in one single row in the cities list table, just to have it as example
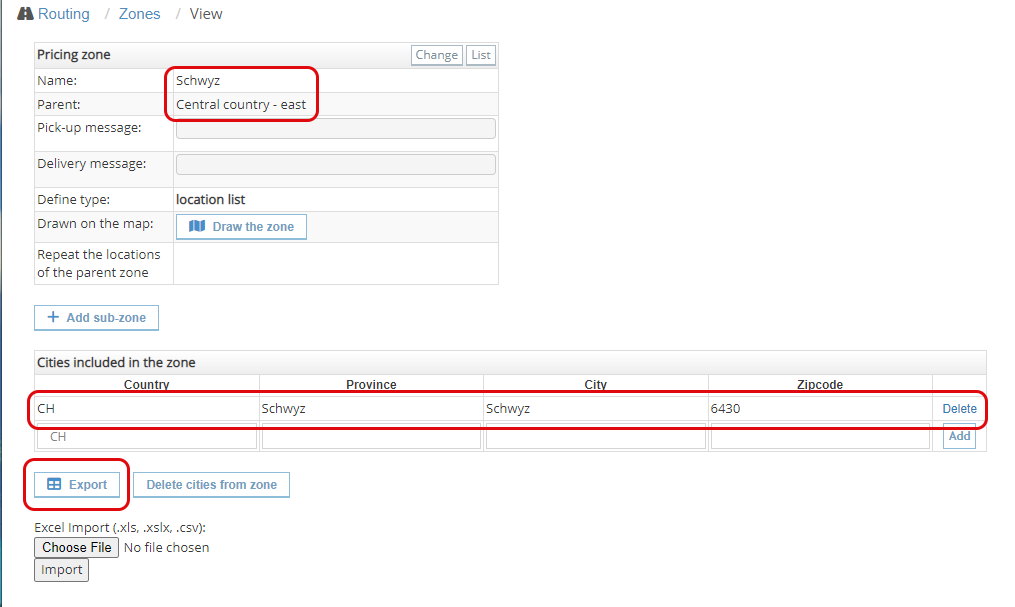
Next, you will press Export and download a .csv file. You will use it as a template for all of your city lists.
Open the .csv file. Bear in mind that a .csv can look different, depending on what software you use to open it with and what is used to separate the values with.
In my case, I chose comma as a separator (it usually is default), so my file will look like this:
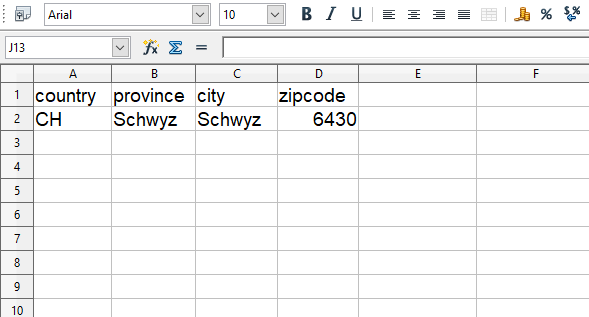
Then, I fill in the whole table with the information I need (country, province, city, and zip code if you use them), save it and then upload it back, using the Import feature (Choose file, and then press Import). The list becomes populated with all the lines you had on your .csv file.

Here is an overview of the pricing zones I created:
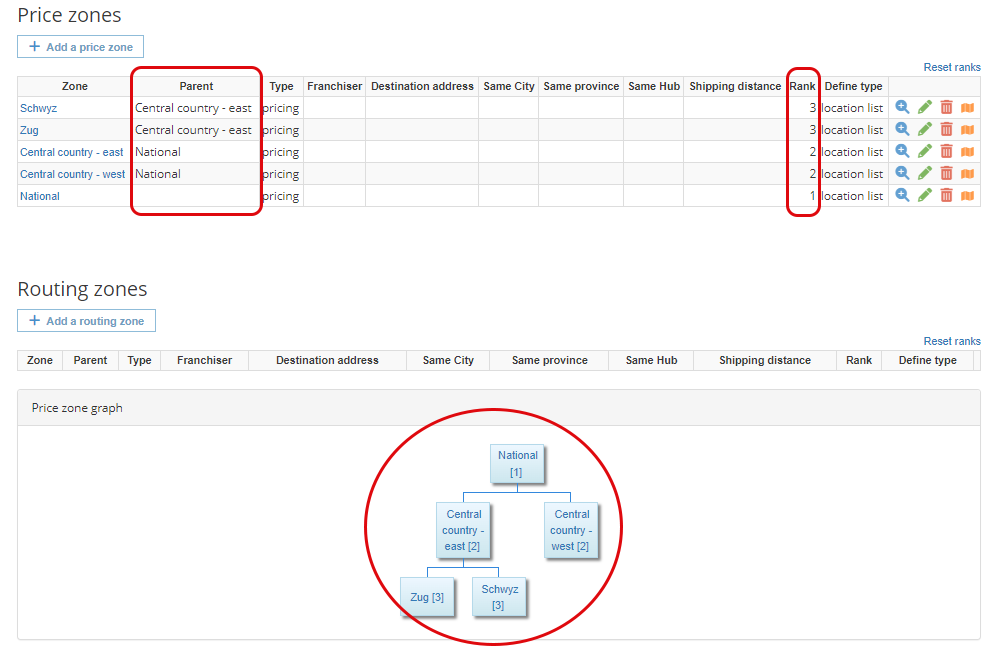
I have three layers of ranks, each will have a different price (you will see how to do that in the Setting up prices article (link)).
Let’s see how these pricing zones work, with a few examples.
An important thing to note is that for a shipment to be in a zone, both the sender and recipient address has to be in that zone.
Sending a shipment from zone Schwyz to zone Schwyz will fall under rank 3 price, but sending another one from zone Schwyz to zone Zug will be rank 2 price zone, because the addresses are not in the same zone, even though they have the same rank. The next rank zone that includes both addresses will be used as the zone of the shipment.
Sending a shipment from zone Schwyz to Central country - east will fall under rank 2 price, but sending a package from zone Zug to Central country - west, on the other hand, will fall under rank 1 price category, National, since the next rank zone that contains both addresses is National (rank 1).
Just as you have created the pricing zones, you can create the routing zones, for your internal cargo management. These zones should be defined depending on your hub(s) and the area you think they should cover. You can create larger zones for the whole hub, smaller zones inside it for specific couriers, or zones that are only for local delivery. If you want more useful information on creating the routing zones, check out the last part of this article (anchor if possible).
The only extra option you have at creating routing zones vs. price zones is choosing a Franchiser (partner company) for that specific zone.
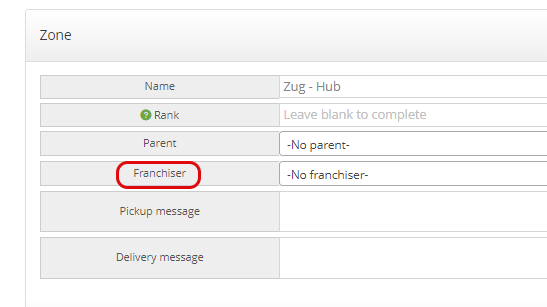
You can always come later and add your franchisers, if you don’t have them set up yet.
As with the pricing zones, you will get a tree or a graph that will show you the relations between your routing zones.
If you need more information on the options you have when using a list of cities, check out this article here on the Cities menu.
- Create zones by drawing them on the map
If you want to set up your zones by drawing them on the map, you need to create them first.
Go to Routing>Zones>+Add a price/routing zone.
In our example, we will create a routing zone.
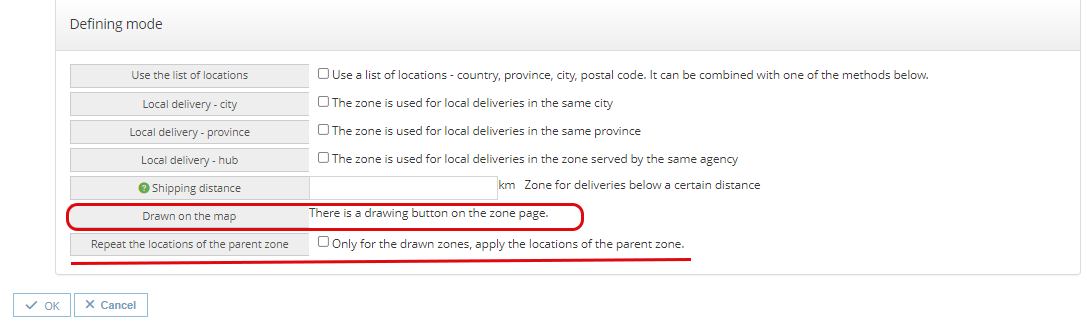
If you want to have the zone only as drawn, make sure the Use the list of locations box is unchecked. You could keep it checked if you also want to use the list of locations together with drawing for the zone.
In the defining mode table, the last two lines refer to drawing the zone on a map. The last one, if checked, allows you to also use the locations from its parent zone, in order to avoid geocoding errors. For example, let’s say the parent location is a city (with the city name as the list), then you create three sub-zones (either for pricing or for routing/delivery couriers), by drawing them. But you want to make sure there are no errors in setting the pins on the map, so you want to also add the name of the city as a list to each sub-zone. Instead of doing this for each and every one of them, you can just check the Repeat the locations of the parent zone box when creating the sub-zone. This saves a lot of time when you have many drawn sub-zones under one bigger parent zone, or if you need to make certain changes later to the parent zone and all that is included in it.
In the following example, I will be creating my company’s routing zones. I created three separate zones that belong each to a hub, they all have the same rank (1) and I defined them using the list of locations mode.
As you can see below, for the Zug Hub zone, I added 2 different provinces, since the zone will cover parts of both provinces.

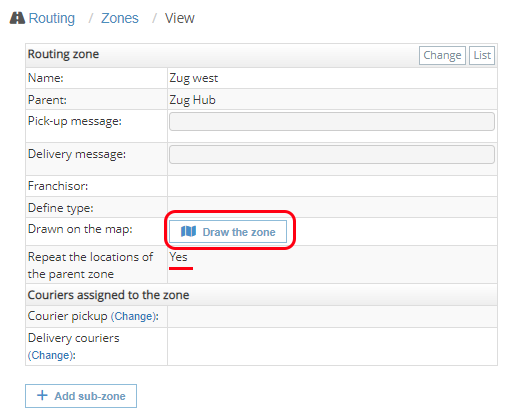
I can now add several sub-zones to it. After I created a sub-zone (I don’t want to use a list of locations, but I checked the Repeat the locations of the parent zone option), I can draw it.
On the drawing page, zoom in on the area you want to draw. Start by clicking on Add polygon, and the draw it by consecutive clicks on the map; to finalize it, click on the first point/vertice you created on the map, and you will end up with your zone.
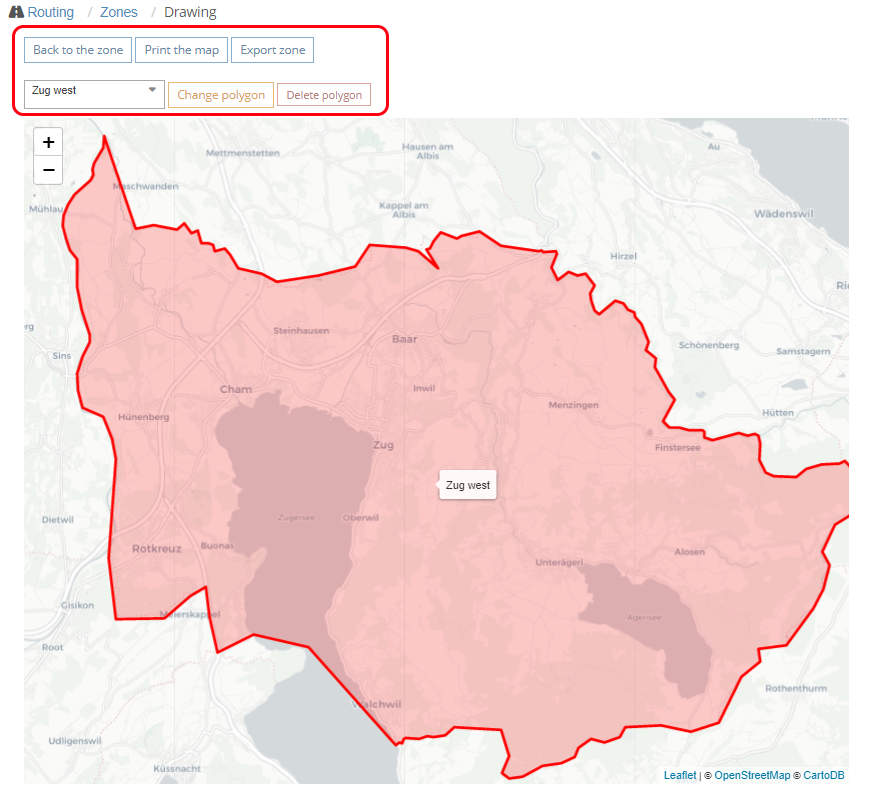
Once, created, you can always edit it further.
Click on Change polygon, and you will be able to see all the vertices you created on that zone.
You can move them around to edit your lines and whenever you click on a vertice, 2 new vertices will be created between it and the next existing vertice, thus allowing you to change the shape of the lines as detailed as possible. Save it by clicking on Finalizing editing.
TIP: it is easier to create a rough simple zone with few vertices and then create the details by editing.

The top menu also allows you to Print the map by saving it as a .png image beforehand, or Export zone by getting a list of the GPS coordinates for each vertice, that you can save. You can go directly from there to another zone you already created and draw it on the map.
When drawing zones one next to the other, it will be easy to connect them, since the vertices of the map you are editing will “snap” to the vertices of the neighbouring zone, as if magnetic. This will ensure you don’t have empty spaces or slight overlaps.

Also, you will notice that the current map you are seeing/editing is always red, while the others are blue.
- Creating zones according to the distance between the sender and the recipient
This option can be very helpful if you make deliveries from fixed locations, or you just want to charge per distance, or the distance to your hub is important to you.
The distance is calculated with the shortest distance by road, not a straight line on the map.
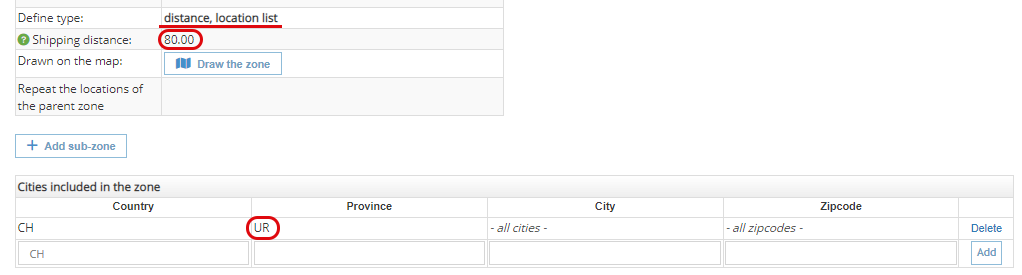
As an example, I will create a zone in one of my price zones, that I called Uri. Let’s say that in Uri, I only do deliveries for one of my clients, a company with one single warehouse, in the north of the zone. Since going to the south of the zone can be more expensive, especially since it’s a less populated area, I would like to charge more.
When creating the Uri zone, I checked List of locations (since I am adding the province name to the list), but I also wrote 80 in the distance box.
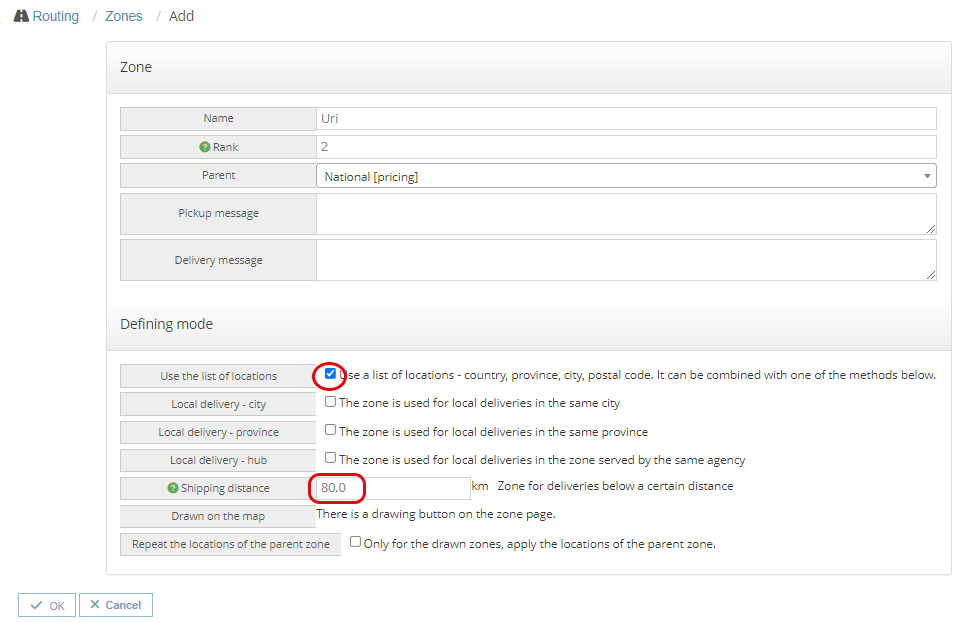
This means that it includes only the province called Uri and within it, all deliveries up to 80 km will fall under the price I will set up for this zone.
You can only use distance if you do not want any other types of restrictions.
I want to charge less for shorter distances from the warehouse, so I create a price sub-zone within my Uri zone, that I call Uri-30, since I want to use it for a distance of 30 km.
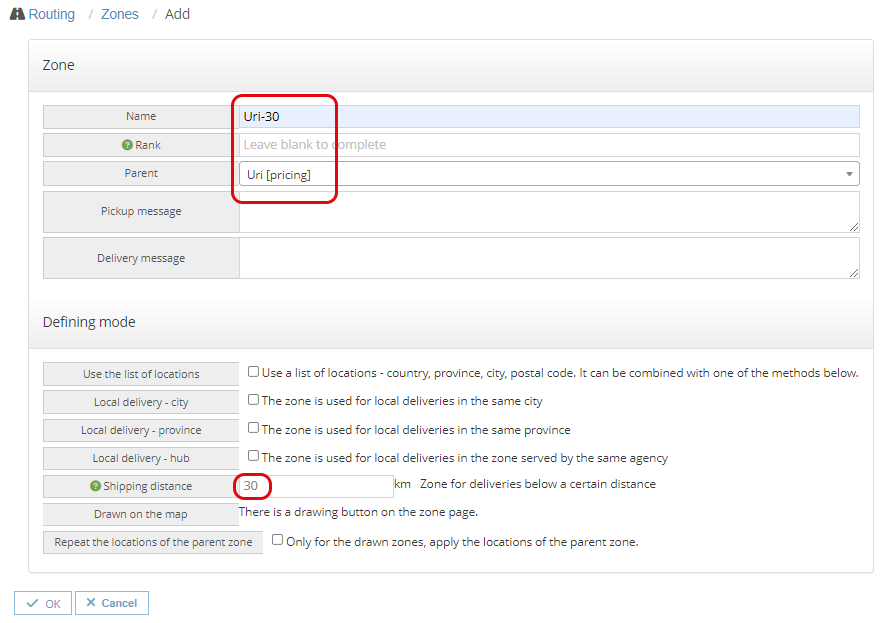
What this means is that a shipment from the warehouse that is less than 30 km long will have a different price than one that is 50 km away from the warehouse, in this specific bigger zone (Uri).
- Creating local delivery zones
Local delivery zones are a special type of zones that allow you to set up specific prices for shipments that have the sender and recipient in the same type of area (same city, same province, or same hub). The delivery zone setting functions with the list of locations option.
Let’s see an example:
I decide to allow local deliveries only in the cities where my hubs are located, since the shipments don’t have to travel very far overall.
I will thus create a new price zone that will include all the lists of those cities.
Since I want this zone to include cities from all of my other zones, I will have its parent only my National zone.
I checked list of locations and also Local delivery - city.
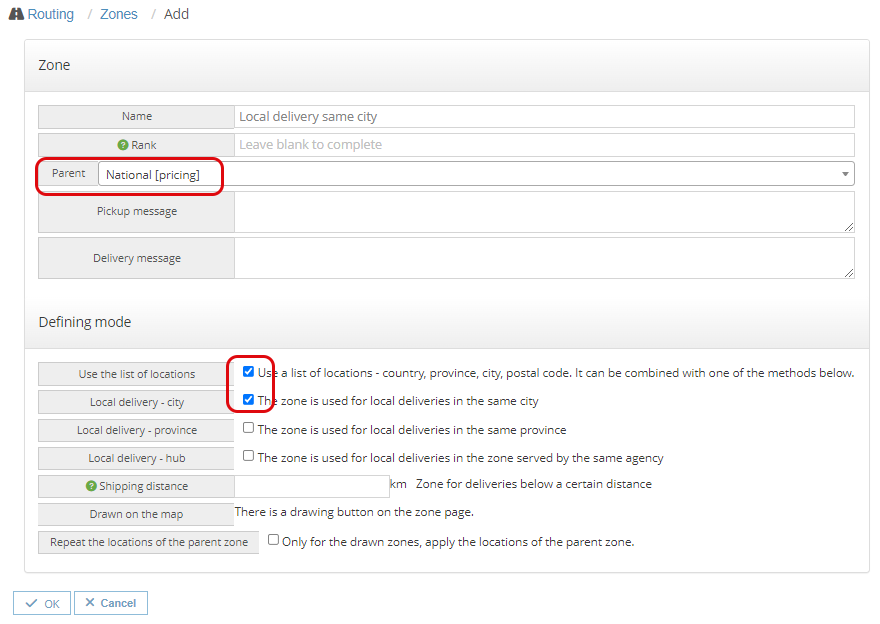
By checking Local delivery - province, the same would have applied, but the price would have been calculated for shipments with a sender and recipient from the same province. The same with hubs, when the sending address and receiving address are in the same hub zone.
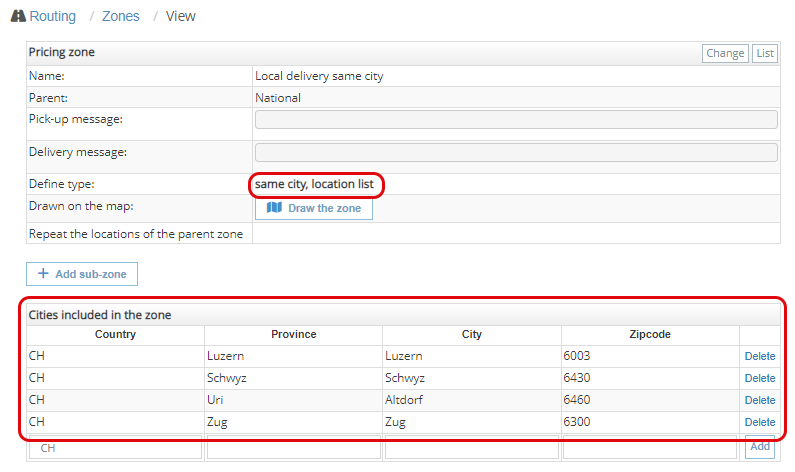
I just added to the list the cities I wanted to have local delivery, and that is all.
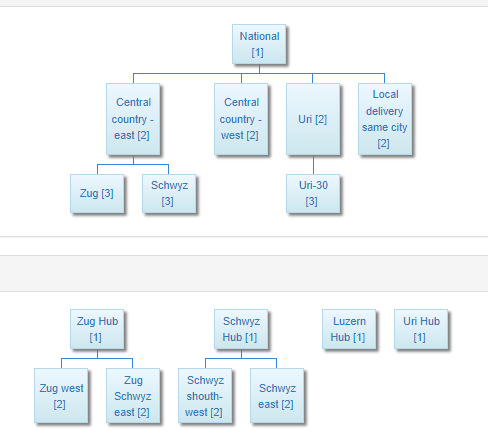
This is a graph overview of the zones I created using all four methods:
Now you should be able to go and create accounts for your clients, so you can set up the prices. Here is where you learn how to: (link catre creare clienti)
- Useful information regarding routing zones
Routing zones
Routing zones are used to help you manage the operational side of your business. You define them the same as pricing zones. You usually work with sender and recipient zones separately - you want to know who should pick up a shipment and who will deliver it and, depending on your number of hubs and degree of automatization, you may even know the route it will take to get there. There are several uses for routing zones.
- Routing zones to define hub areas
For companies with a presence in more than one city, routing zones are essential to define the area allocated to each hub. If for example you have a presence in each province of a country you will define a hub for each (from the Hubs menu in the Routing main menu), and the software will automatically create a routing zone for each hub. You will then define each one (either by drawing or by adding cities/provinces/countries), and this will allow the software to know the departure and arrival hub for each shipment. Both hub names are printed on the label. If you have a sorting hub, it can also very visibly print gate information based on destination hub so it will be easy to sort.
If you have a larger number of hubs, you will very likely want to keep track of transports between those hubs. To do so, you can define regular routes in the Routes menu, and individual runs in Runs and Scheduled Runs (that are only available for the Enterprise mode). Since the software will know the destination hub and also the hubs that can be arrived at by any route, it will alert you when a package is loaded in the wrong transport.
- Routing zones as delivery areas for couriers
You can define sub-zones for a hub's routing zone (just create a regular routing zone and set the parent). Those will also be printed on the label, and can be used to sort packages at the level of courier or courier team. Usually those will be smaller, either drawn on a map or defined by zip codes (or lists of smaller towns). This goes nicely with our auto-routing features. A possible flow we suggest is to scan each sub--zone package to a courier as they arrive in the hub. Then when there's time to make the routes, if it's a smaller one-man zone just create a roll cart for that courier and optimize it.
If it's a larger zone, use the Auto-routing function in the Shipments menu - select all those shipments you've allocated to that courier, go to More actions, Auto-route, then select the couriers that work in that area. The software will automatically split the shipments to those couriers, create a roll cart for each, and also optimize each roll cart.
- Sending shipments through partner companies
Routing zones can be used to send shipments to be delivered by partner companies (we call all partner companies franchisors, whether they are big or small). If you are a local courier company, but you want to send shipments nationally or internationally, you can just partner with another company and set up two routing zones - one in which you deliver yourself, and one in which shipments will be automatically sent to the other company through an API integration. The software will manage sending the info to the franchisor's system, will get back status updates including when the shipment is delivered, help manage Cash on Delivery amounts and much more. The system will know and be able to scan both our internal shipment number and the franchisor's, and you can choose if you want to print your label or directly theirs. You can take a quick look at the list of companies we're already integrated with by going to the Franchisors page, clicking Add and taking a look at the "codes" field. This includes, of course, all companies using Courier Manager.
You can find more info on the section on integrating franchisors (link). If you want to partner with a company that is not there, it's ok - we have an open API which you can use to implement your own integration (link) with any company.
Many courier companies use semi-independent contractors to service a certain area. In this case you don't need to do the above, since they don't use their own separate software platforms. Just create regular employee accounts in the software, and organize them by creating a hub and a franchisor for each company. The software will assist you with access permissions per hub (don't check the view_all_hubs right for them) and also by helping you calculate commissions - check out the Commissions sections when adding a franchisor and also the commissions report in the Reports menu.
Now that you know how to create your zones, you can move to the next step: Adding clients.