Mobile App User Guide
Mobile App
User Guide
CONTENTS:
1. INSTALLING THE APP
2. USERNAME, PASSWORD & LOGGING IN
3. LOADING AND FINISHING THE DAY
4. MENU OVERVIEW
5. STOPS
6. SHIPMENTS
7. BULK OPERATIONS
8. QUICK BULK
9. GET SHIPMENTS
10. SYNC
11. ADD SHIPMENT
12. ADD ROLLCART
13. FOREIGN SHIPMENTS
14. EXPENSES
15. FUELING
16. DAILY REPORT
17. OTHER
1. INSTALLING THE APP
From the Play Store on an Android phone (the app is called Courier Manager). This is the app used by couriers and hub workers.
In case your devices do not have access to the Play Store, the mobile app can be downloaded from the following link: https://app.couriermanager.eu/cscourier/d/app.apk
When you install it by downloading directly, in case you are prompted the Install blocked message, go to Settings and check the Unknown Sources box.
2. USERNAME, PASSWORD & LOGGING IN
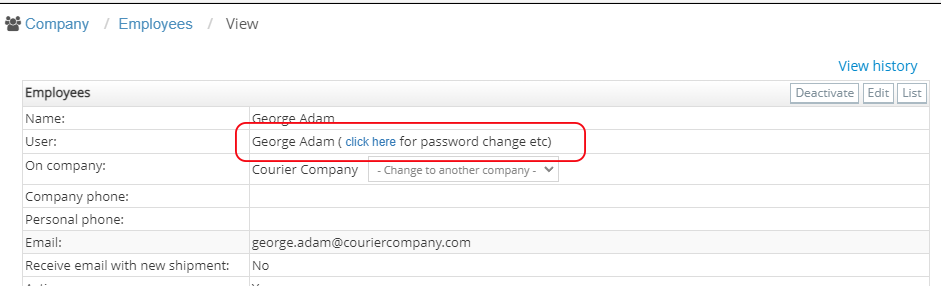
- The username and password will be created by the administrator in the web application. A detailed guide on how to do this can be found here. If you want to change the password of a certain user, go to Company → Employees, click on the name of the user and then change the password.
- Before the first login, the application will request the company’s name. If there is a certain way you should write this, you will have received this from your manager, otherwise just write the company name.
- At login for fillings reports, the user may be required to select the car he is driving. All the cars in the user’s hub can be visible to choose.
3. LOADING AND FINISHING THE DAY
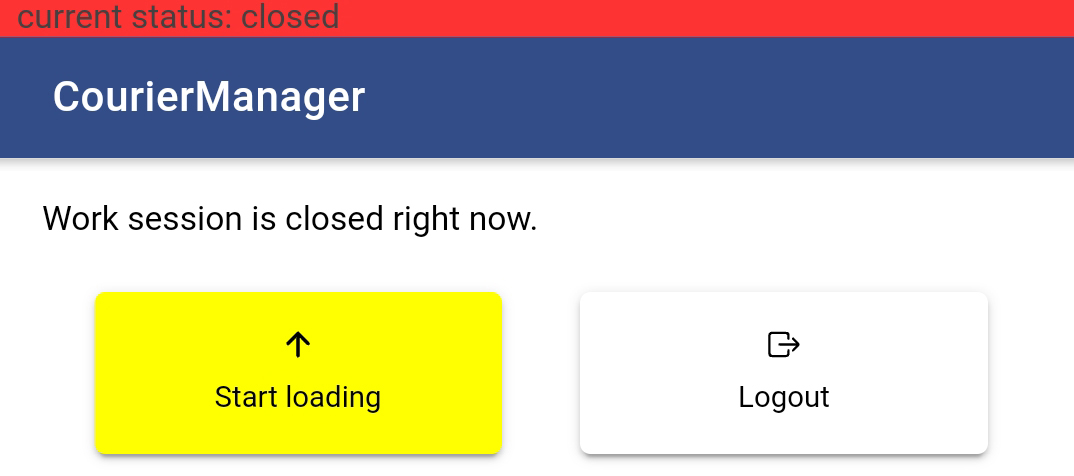
This is a new feature and might not appear to all users. If the admin has chosen the “Always active” option for a courier, he will not be seeing this.
Before going on your route, you will need to “load” all your assigned parcels into the application. You can do this by tapping the Start loading button. The following menu will show up. Tap Start loading.
You can start scanning your shipments by pressing MOBILE SCAN.
After scanning the shipments, you can tap CHECK. If you have not scanned all the packages assigned to you, the application will let you know about it.

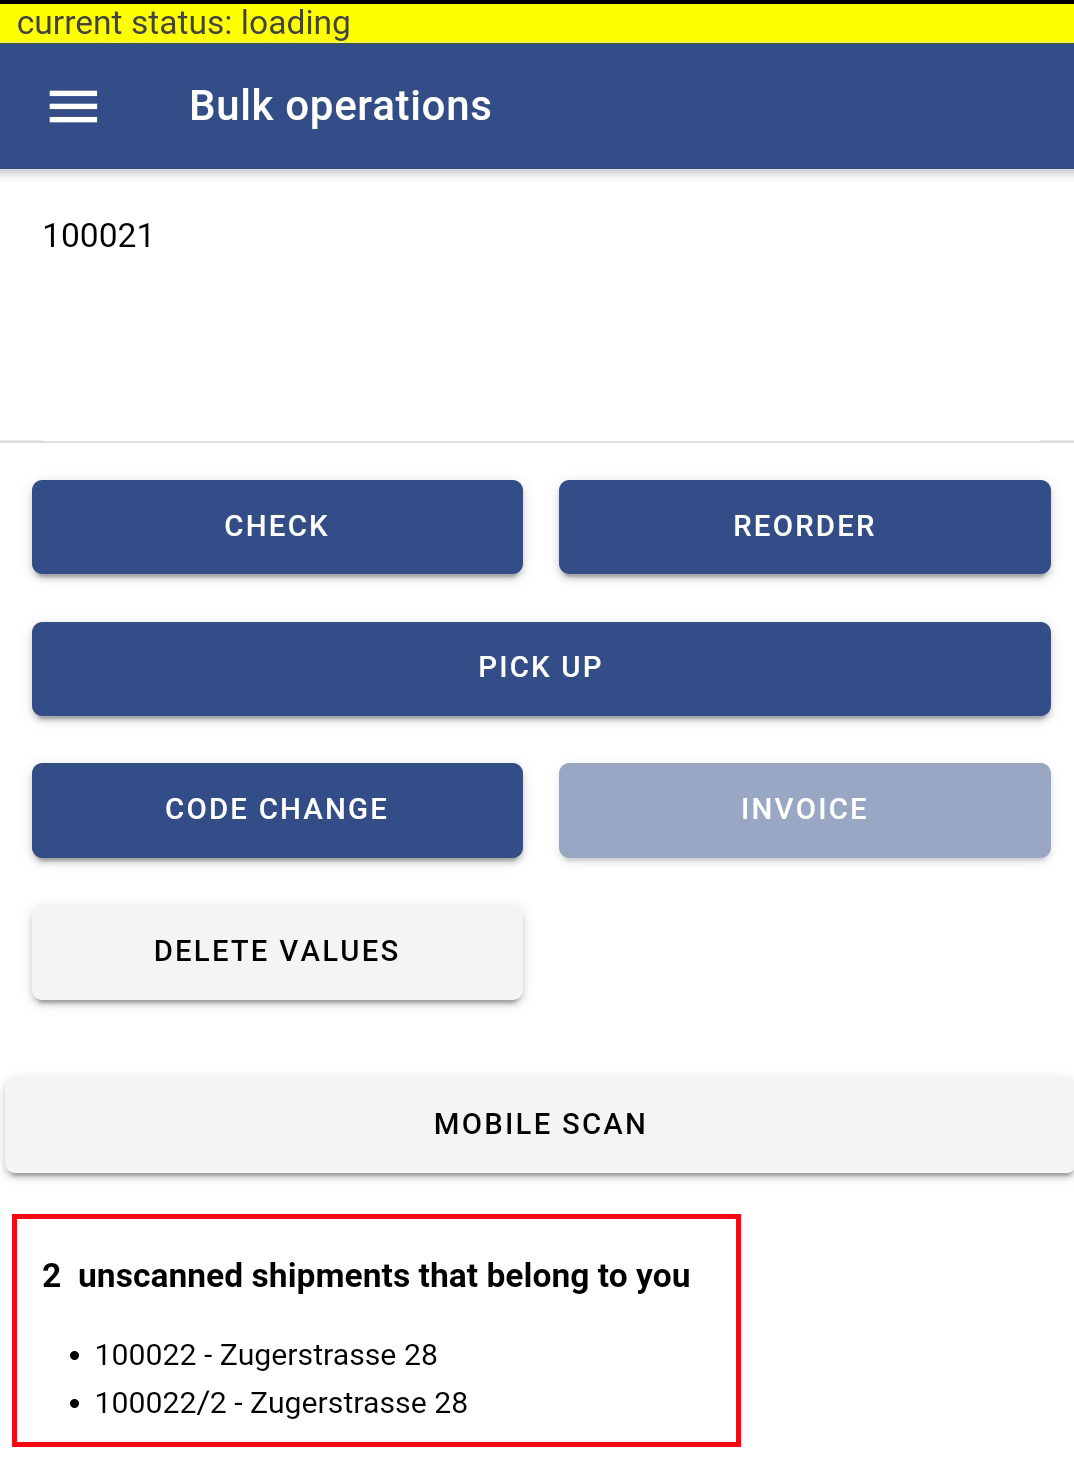
If you have scanned all the shipments assigned to you, tap CHECK again, and you should get the message OK under the MOBILE SCAN button. If you tap PICK UP, all the scanned shipments will be allocated to you (even if previously they weren’t). You can get more information on the other buttons in the 7. BULK OPERATIONS overview.
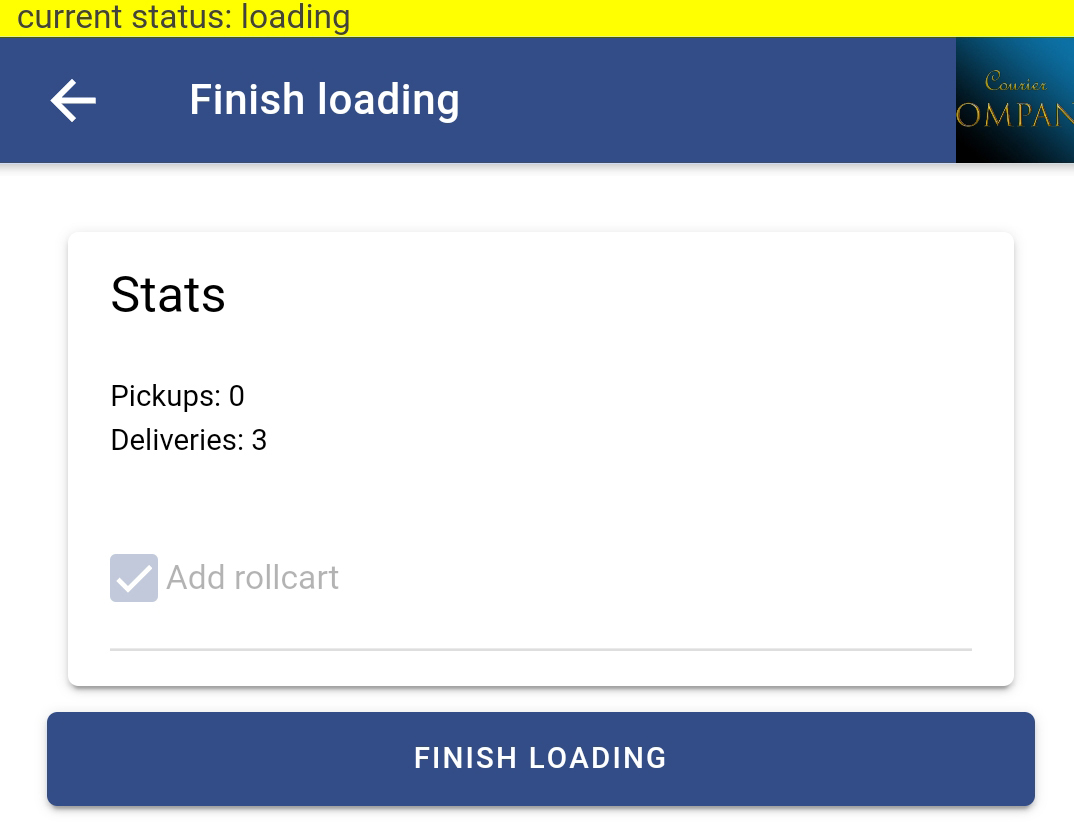
Then go to the MENU button on the top left and tap Finish loading.
You should get a small list of the number of total pickups and deliveries. You can tap the FINISH LOADING button and start your route.
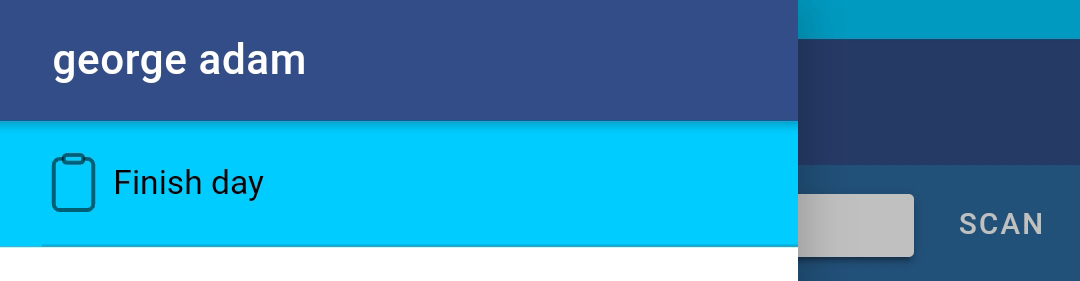
At the end of your day, you have to finish your day. Do it by tapping MENU button (the 3 lines top left), then tap the blue button, Finish day and follow all the steps.
4. MENU OVERVIEW

This is the MENU overview. You can always access the Menu by pressing the three lines button on the top left of the screen

5. STOPS
This gives you an overview of your stops for the day. You can also check the map (on the bottom left of the screen) to see all the stops in order (red ones), as well as your own location (the blue pinpoint).
6. SHIPMENTS
This is the menu where you will manage all of your shipments.
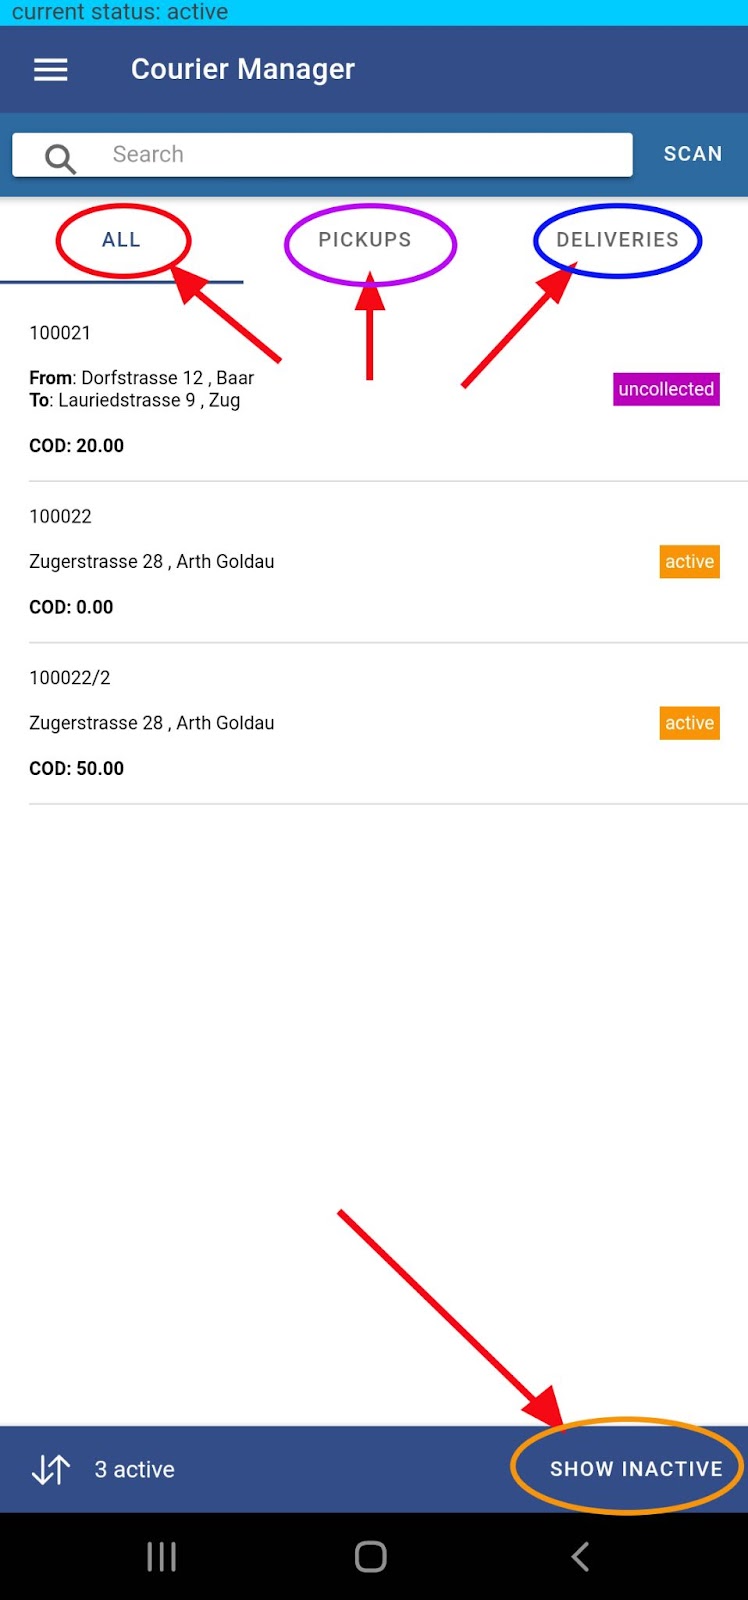
You will see a list of your shipments, with different viewing options.
If you tap ALL, you can see all your active shipments.
If you tap PICKUPS, you can see all your active pickups.
If you tap DELIVERIES, you can see all your active deliveries.
If you want to see all of your inactive shipments (those already delivered or already picked up), tap the SHOW INACTIVE at the bottom right of the screen.
When you tap a shipment, all information related to that shipment will be opened.

You can tap on the Map. The first time you use the app, you will be prompted to choose the navigation application of your choice. Afterwards it will be opened automatically.
You can PICK UP, DELIVER or NOTIFY a shipment.
If the shipment is for pickup, you can only tap the PICK UP button and not the DELIVERY button and vice versa.
You can use the NOTIFY button when you could not pick up or deliver the shipment. When you do that, the shipment will change the status in the system to NOTIFIED.
When you notify a shipment, you will get the option to add or change a code (you can also do it anytime in the Other Info section), add a comment or print a status notice to leave behind.
You can always take a photo related to that shipment if you need to (bottom right of the screen, by tapping the camera icon).
The ACTION LIST button gives you several options:

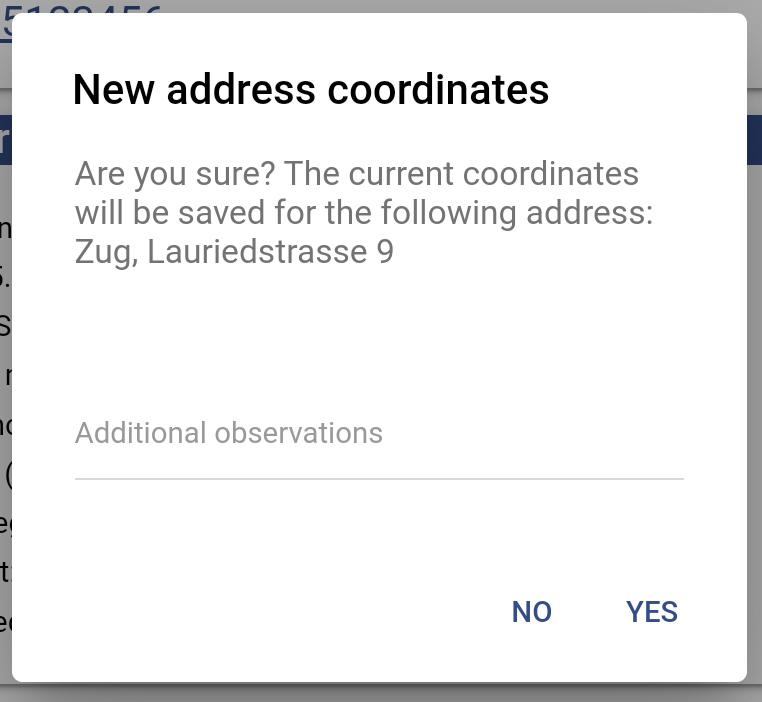
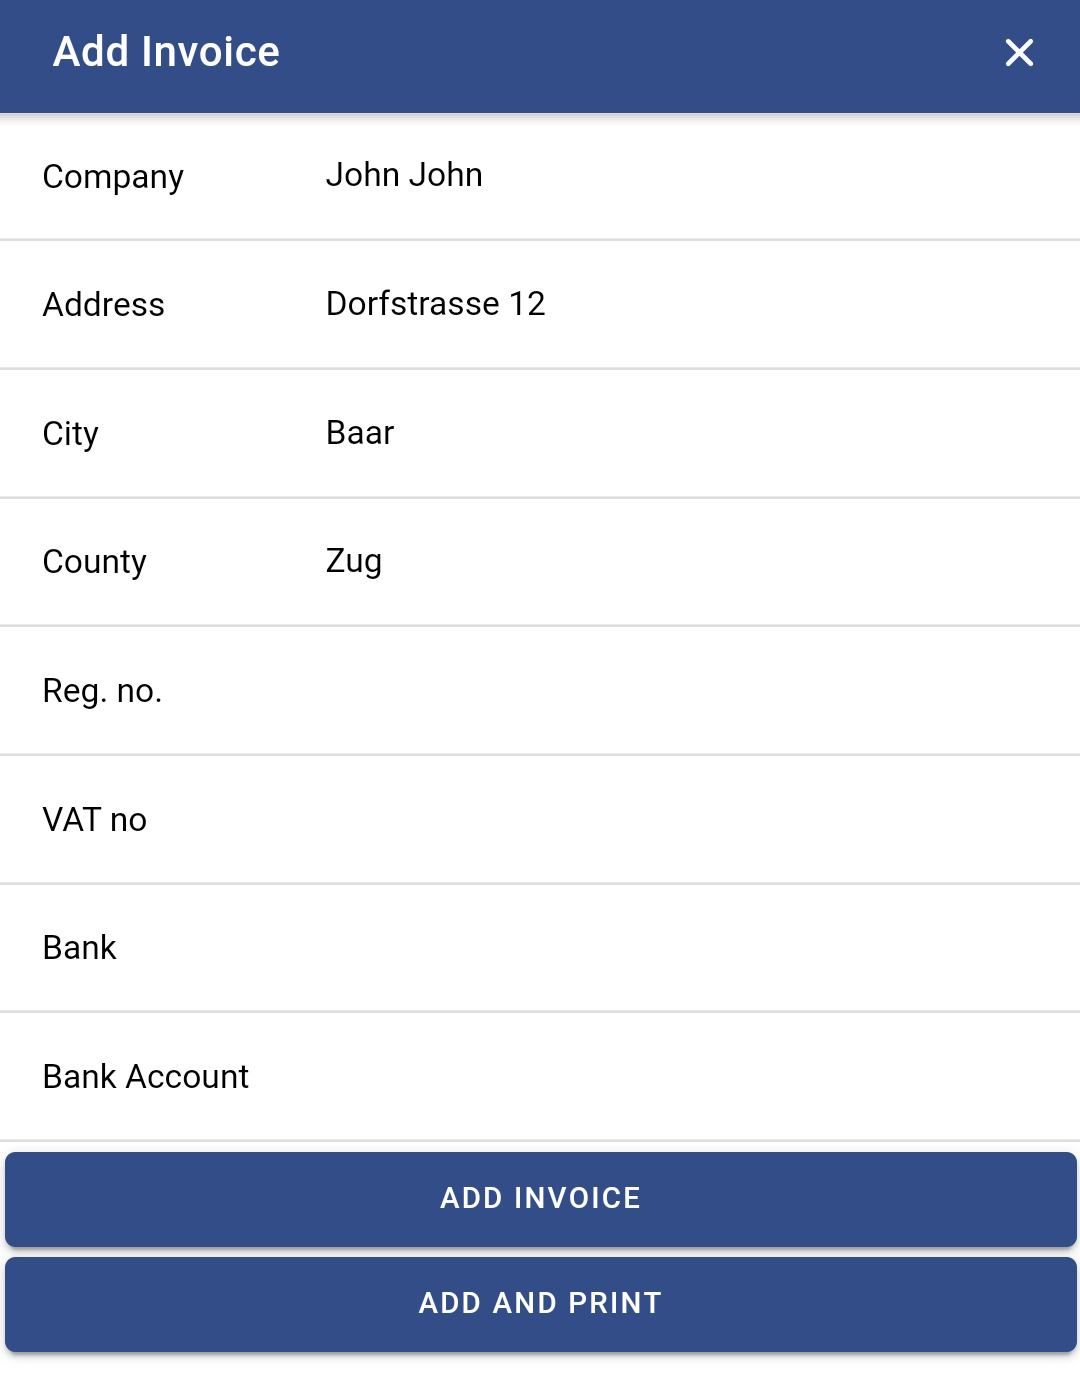
Print lets you print several documents related to the shipment, Save address allows you to assign your current coordinates for this address (for future use, in case of expeditions with the same address) and also add comments to the save. Add invoice lets you add an invoice for the shipment and also print it, if you need to.
7. BULK OPERATIONS
This option allows you to perform changes to one or more shipments that you can scan.

After scanning (by tapping the MOBILE SCAN button; the numbers of the shipments will show up on your screen), you have several options:
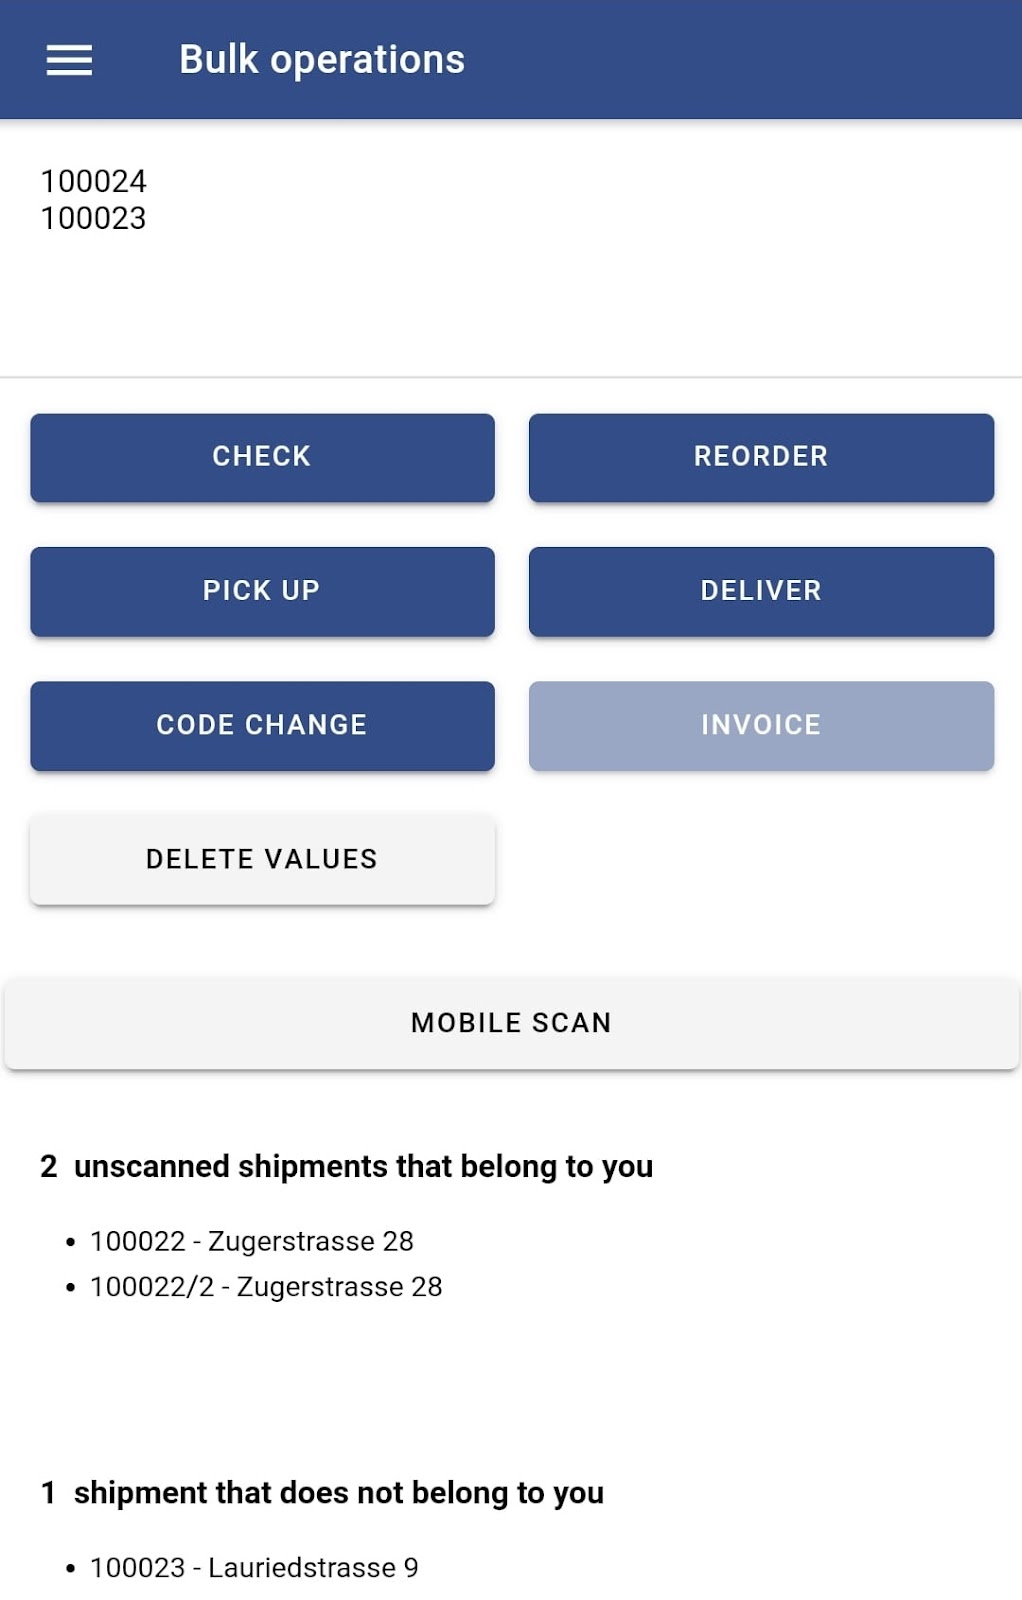
CHECK will let you know how the shipments you have scanned relate to those assigned to you. As you can see in the example listed here, the courier has scanned two shipments. After pressing CHECK, the app lets them know there are other 2 packages assigned that they did not scan and one of the new scanned shipments has not been assigned to the courier.
REORDER sets a new order to the list of STOPS and shipments (go there by tapping MENU, then STOPS), according to the order in which the shipments were scanned.
PICK UP DELIVER and CODE CHANGE allows you to perform these actions for all the shipments you have scanned.
DELETE VALUES deletes from the above list all the shipment numbers you have scanned.
INVOICE issues invoices for multiple shipments. You can only use it if the admin has given you the right to use it.
8. QUICK BULK
Quick Bulk allows you to deliver or pick up shipments that are made up of more parts/packages, only by scanning one of the parcels. This way, you do not need to scan the code bars from each part of the shipment.
9. GET SHIPMENTS
Used for continuous scanning. Each scanned shipment will be assigned to the courier, set as active in case it was yet uncollected, and it will also display information about its final delivery hub and zone. It may also show errors in case the system is considering that it’s being loaded in the wrong car.
If a code is selected, it will set that code to all scanned shipments.
10. SYNC
It updates your current shipment list. In case your device has internet connection, the list synchronizes automatically every ten minutes.
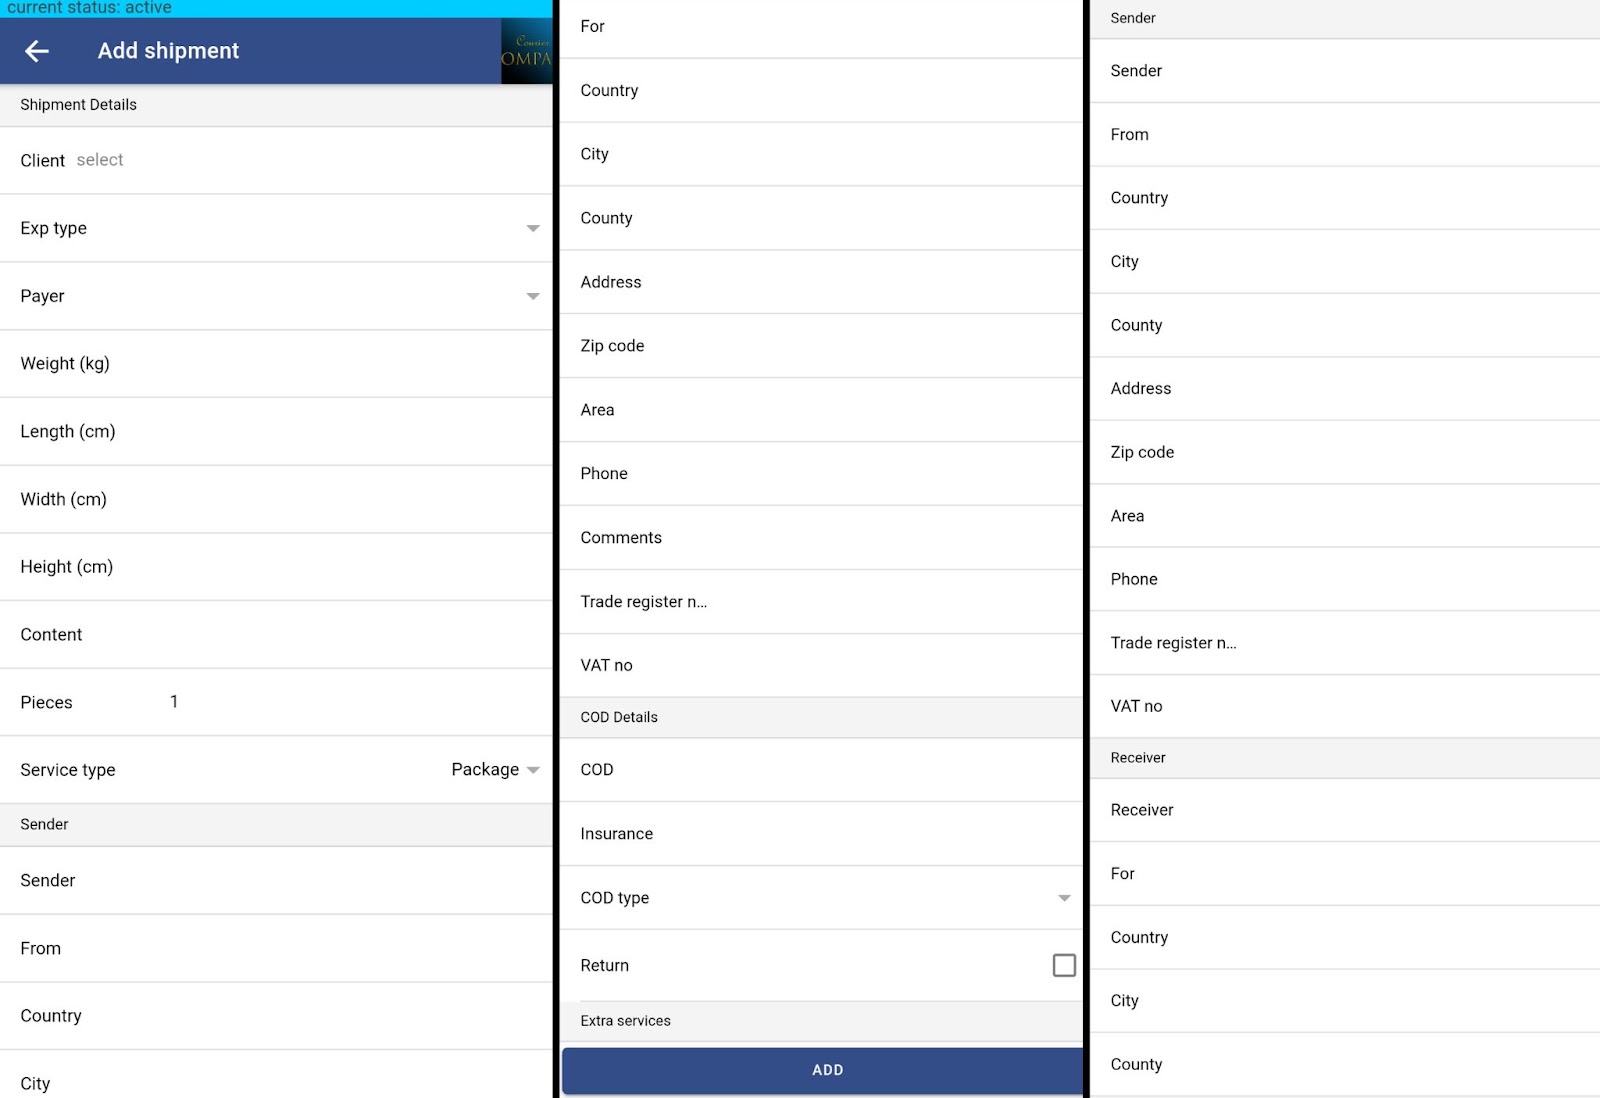
11. ADD SHIPMENT
Add Shipment allows you to add a brand-new shipment in the system. You will then have to fill in manually the same fields as in the desktop app - you will have to scroll down to see it all - and tap ADD at the bottom of the screen. Clients can be easily selected from the database. Cash on delivery info or extra services can be checked if the case.
12. ADD ROLLCART
This option will allow you to add a rollcart with the current shipments. Its route can be optimized automatically, and you can also re-use this button whenever you receive new stops that disrupt your current route - it will re-create a new optimized rollcart that includes the new stops.
13. FOREIGN SHIPMENTS
Using the scanner, you can introduce in the application shipments that don’t come directly from the user’s company.
14. EXPENSES
This module enables you to load expenses in the app. Introduce the amount spent, expenses details, take a photo of the receipt and save it. You will receive a notification when it has been added.


15. FUELING
Enables the entry of a fueling report.
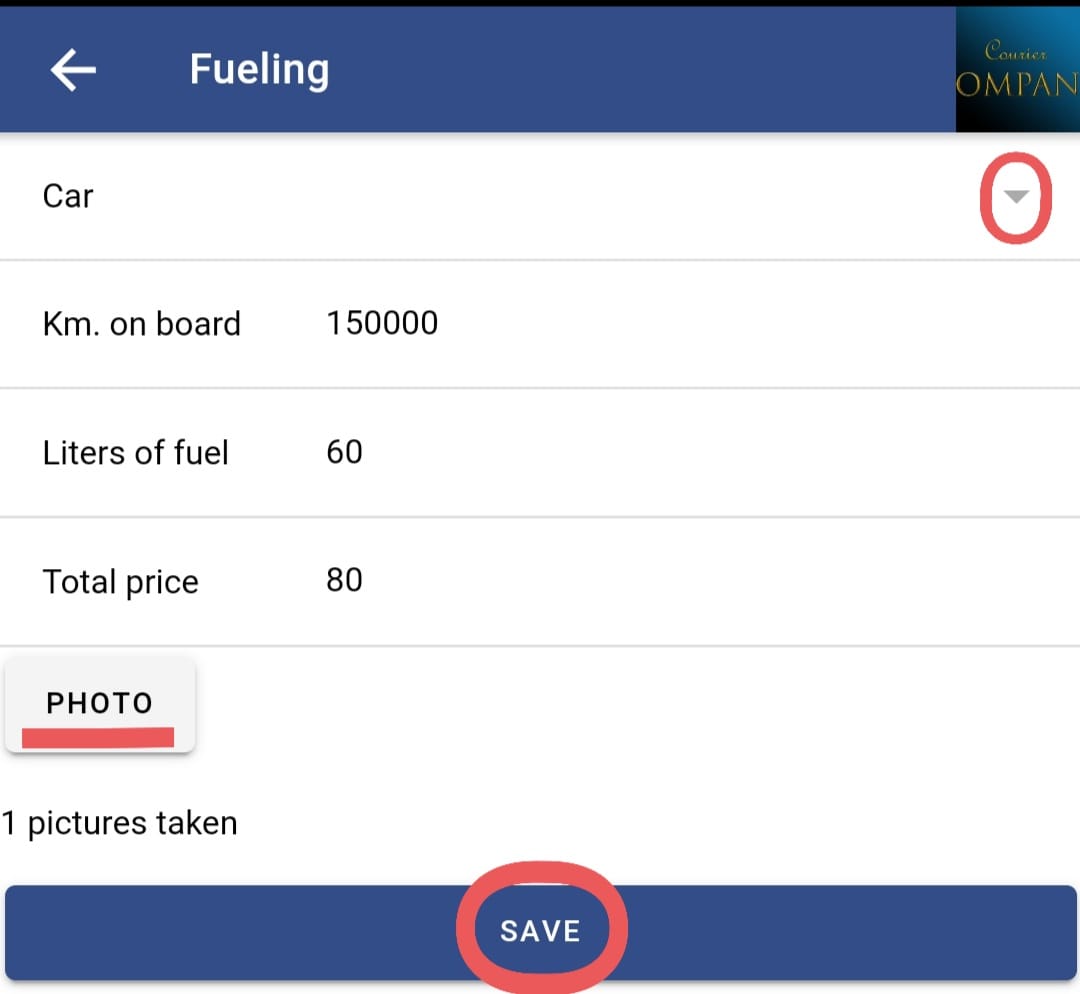
In order to do that, please
- choose the car from the drop-down menu
- fill in the required information (km on board of the car, liters of fuel and the total price you paid)
- take a photo (of the gas station, the receipt, the dashboard, whatever you are required by your company rules)
At the end, tap SAVE.
16. DAILY REPORT

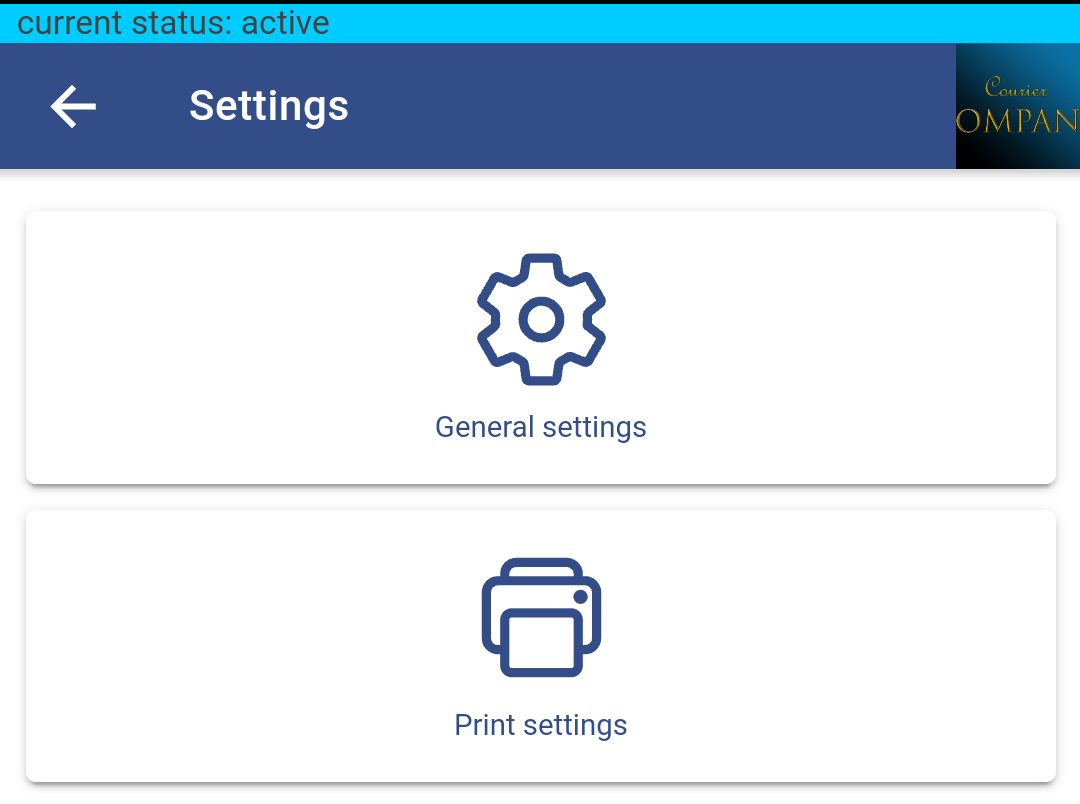
There are two types of Settings, General settings and Print settings.

General settings allow you to change details regarding the car, the company, language, etc.

In Print settings, you can change settings related to your printer. For more information, check your printer’s manual.
18. OTHER

Whenever a new shipment is attributed to you, you will immediately receive an alert, to let you know about it.